Manual Guide
Pull the latest Findora docker image#
Navigate to your project folder and do the following:
Pull docker image
Here, we are downloading the
findoradwhich is the node of the findora network, for security and stability reasons. Make sure to download version0.3.19-releasedocker pull findoranetwork/findorad:v0.3.19-release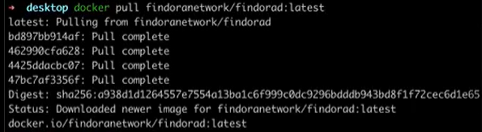
Check to confirm that you have the lastest version by checking for the
latesttag as seen in the picture belowdocker image ls
You will need the Findora Node Setup (fn) CLI tool that contains the neccessary sub-commands to setup a validator node and stake/unstake FRA. Download according to your operating system
Move your downloaded
fnto your path directory by either runningmv fn /usr/local/bin/
or by running the command below if you moved the fn file to home
```cp $HOME/fn /user/local/bin/```
<img src={useBaseUrl("/img/validator_setup_guide/manual-setup-3.png")} />Ensure that binaries have executable permisions set correctly

Configure Local Node#
Set Environment Path Variables
export ROOT_DIR=< The data path of your node >
Initialize Findora Node and Create a Node key
Initializing Tendermint will create a node key (stored in a newly created ${ROOT_DIR}/tendermint/config/priv_validator_key.json file). The node key will be used to identity your node, sign blocks and perform other tendermint consensus-related tasks.
note
We're going to clean up any old data you might have in the directory by removing the ROOT_DIR folder, but first check to be sure you have your backup keys - Validator, node and wallet key. Since the ROOT_DIR is the source of the connection to mainnet, you might lose your keys and funds if a mistake is made.
sudo rm -rf ${ROOT_DIR}Make ledge data directory
sudo mkdir -p ${ROOT_DIR}Initialize tendermint
# For testnet docker run --rm -v ${ROOT_DIR}/tendermint:/root/.tendermint findoranetwork/findorad:latest init --testnet || exit 1 # For mainnet docker run --rm -v ${ROOT_DIR}/tendermint:/root/.tendermint findoranetwork/findorad:latest init --mainnet || exit 1 Set correct permission
sudo chown -R `id -u`:`id -g` ${ROOT_DIR}/tendermint/
- Download latest link and get URL
set your namespace to the current environment you are working on
export NAMESPACE=testnet export NAMESPACE=mainnetget latest chain link and export url to file
export CHAINDATA_URL=$(cut -d , -f 1 "${ROOT_DIR}/latest")run
echo $CHAINDATA_URLto check link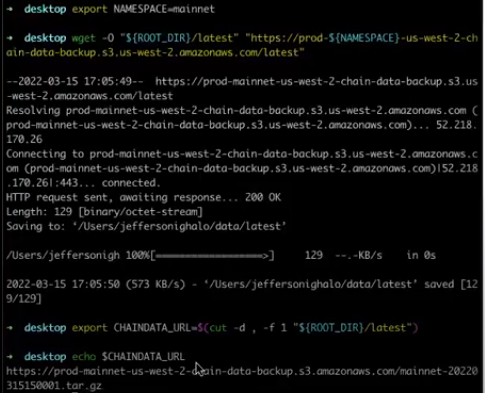
Next, you need to download the data from the link gotten in the step above. This might take a while.
wget -O "${ROOT_DIR}/snapshot" "${CHAINDATA_URL}"
- run the following commands to finish the process
mkdir "${ROOT_DIR}/snapshot_data" tar zxvf "${ROOT_DIR}/snapshot" -C "${ROOT_DIR}/snapshot_data" mv "${ROOT_DIR}/snapshot_data/data/ledger" "${ROOT_DIR}/findorad" rm -rf ${ROOT_DIR}/tendermint/data mv "${ROOT_DIR}/snapshot_data/data/tendermint/mainnet/node0/data" "${ROOT_DIR}/tendermint/data" rm -rf ${ROOT_DIR}/snapshot_datanote
If you encounter a security issue error when trying to initialize findora node, you may need to manually approve its security privileges in your OS first. Then re-run the command again.
Generate Staking Key#
Up next is to generate a new, random pair of public and private keys for your new node which will be used for FRA staking.
First step is this command
fn genkey > ${ROOT_DIR}/tmp.gen.keypair View the contents of your tmp.gen.keypair file with this command:
cat ${ROOT_DIR}/tmp.gen.keypair
An example of the file's content is below. Note: the pub_key and sec_key below are examples. Do not use them in your own node.
Wallet Address: fra1955hpj2xzkp4esd5928yhtp0l78ku8fkztvwcypvr8mk6x8tkn6sjsajunMnemonic: repair drink action brass term blur fat doll spoon thumb raise squirrel tornado engine tumble picnic approve elegant tube urge ghost secret seminar blameKey: {"pub_key": "LSlwyUYVg1zBtCqOS6wv_49uHTYS2OwQLBn3bRjrtPU=","sec_key": "b0MGhK7xaRQHuhzFkaBhQ1o4GwTumJEWt1NQ7FChNwA="}
note
For convenience, you can import the sec_key (aka private key) into any Findora wallet (Win/Mac wallet, mobile wallet, CLI wallet tool, etc.), to more conveniently check and manage your FRA balances or to view historical transaction data for this wallet address. The private key or the mnemonic should never be shared with anyone, even with people from the Findora community or development team. Our mods will never ask for this information. It would be advisable to keep a backup of your mnemonic on a separate storage, should you ever need to restore it.
Store security key#
Store your security key by running the following command
# For Testnetecho ${ROOT_DIR}/tmp.gen.keypair > ${ROOT_DIR}/testnet_node.key# For Mainnetecho ${ROOT_DIR}/tmp.gen.keypair > ${ROOT_DIR}/mainnet_node.keyStore Mnemonic Words into ${ROOT_DIR}/node.mnemonic#
For convenience in setting up your node via the fn tool, store your 24 mnemonic keywords (located inside tmp.gen.keypair) into ${ROOT_DIR}/node.mnemonic. To accomplish this, open the tmp.gen.keypair file and copy all of the 24 mnemonic keywords specific to your node. Then paste these 24 mnemonic keywords into the command below. Note: the 24 mnemonic keywords in the example command below (repair, drink, action, brass...) are examples. Do not use them.
# ex)# echo "repair drink action brass term blur fat doll spoon thumb raise squirrel tornado engine tumble picnic approve elegant tube urge ghost secret seminar blame" > ${ROOT_DIR}/node.mnemonicecho <24 mnemonic keywords> > ${ROOT_DIR}/node.mnemonicConfigure your validator node to use your newly generated public and private keys:
# Link the fn client to the Findora address # For testnet: fn setup -S https://prod-testnet.prod.findora.org # For mainnet: fn setup -S https://prod-mainnet.prod.findora.org # Connect your staking key (now stored inside `node.mnemonic`) # to fn. This allows fn to sign transactions on your behalf # ex) # fn setup -O ${ROOT_DIR}/node.mnemonic fn setup -O <Path to the mnemonic of your node> || exit 1 # Connect your Node Key to fn # ex) # fn setup -K ${ROOT_DIR}/tendermint/config/priv_validator_key.json fn setup -K <path to validator key> || exit 1Start or Upgrade Local Node#
# Stop your local container if necessary docker rm -f findorad || exit 1# Start your validator containerdocker run -d \ -v ${ROOT_DIR}/tendermint:/root/.tendermint \ -v ${ROOT_DIR}/findorad:/tmp/findora \ -p 8669:8669 \ -p 8668:8668 \ -p 8667:8667 \ -p 26657:26657 \ -e EVM_CHAIN_ID=2153 \ --name findorad \ findoranetwork/findorad:latest node \ --ledger-dir /tmp/findora \ --tendermint-host 0.0.0.0 \ --tendermint-node-key-config-path="/root/.tendermint/config/priv_validator_key.json" \ --enable-query-service --enable-eth-api-serviceLogging for Node
docker logs -f findoradCheck Local Node Status#
If the following commands return status messages without any errors, then your node has been successfully configured and started:
curl 'http://localhost:26657/status'curl 'http://localhost:8669/version'curl 'http://localhost:8668/version' # Only if you set the 'ENABLE_LEDGER_SERVICE'curl 'http://localhost:8667/version' # Only if you set the 'ENABLE_QUERY_SERVICE'