Rialto Bridge User Guide
Overview
Rialto is a bidirectional bridge that connects Findora to other EVM-compatible blockchains. This guide will walk you through how to configure the bridge to move assets from Binance Smart Chain (BSC) to Findora while using your Metamask Wallet.
Below are the key steps to move assets over from a source network (such as BSC) to a destination network (such as Findora).
Step-by-Step Instructions
Step 1: Configure Metamask for both BSC and Findora
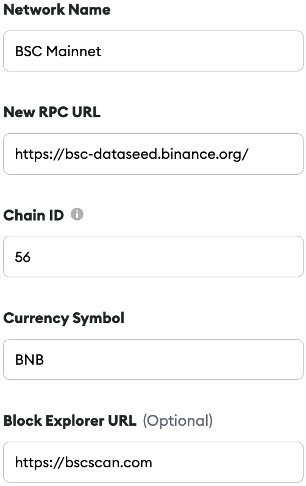
Goto Metamask’s “Add Network” screen and configure Metamask to connect with BSC using the settings below:
Next, goto Metamask’s “Add Network” screen again and configure Metamask to connect with Findora using the settings below:
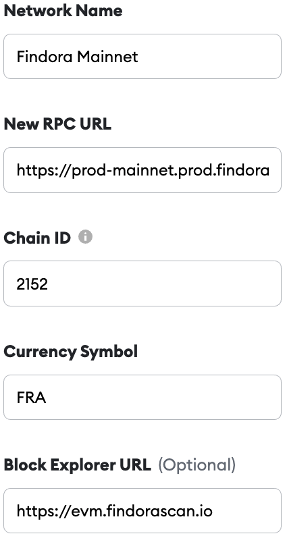
Check this link for more details on Findora Mainnet network configuration
Step 2: Fund Metamask with BNB Tokens
Rialto bridge transactions whose assets originate from BSC must pay BNB gas fees on the BSC side of the bridge. Thus, you must first buy or transfer BNB tokens into your BSC Mainnet Metamask wallet. If you don’t have BNB tokens, you can buy them from an exchange like Binance.com or any of the exchanges listed on this page.
Special Note: If you are a developer using the testnet version of Rialto bridge, you can get testnet FRA from the Findora Discord #faucet channel. To learn more about how to claim the tokens, checkout this guide.
Step 3: Transfer Tokens Across Bridge
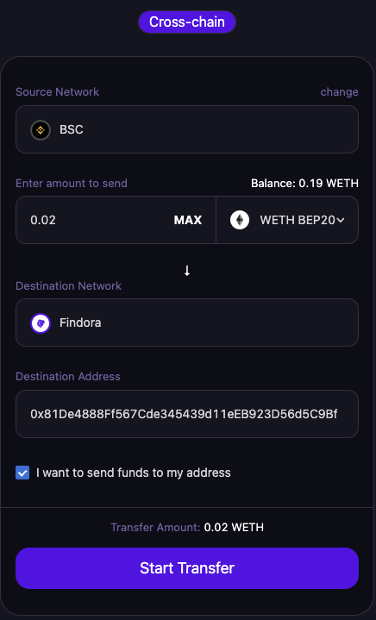
- Goto rialtobridge.io and connect your BSC Metamask wallet.
- Next set the “Source Network” to BSC.
- Enter the token type and token amount you wish to send from BSC to Findora.
- Enter your destination (Findora) wallet address and click “Start Transfer”.
To send the funds to the same destination wallet address (i.e. set both sending BSC address and receiving Findora address to the same value), click the “I want to send funds to my address” checkbox.
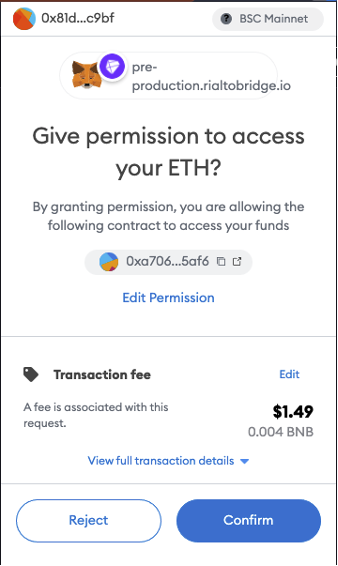
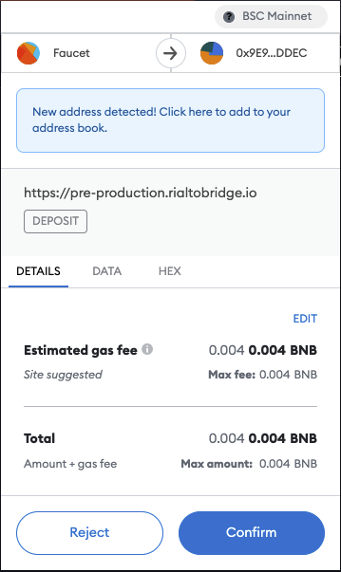
Step 4: Confirm Metamask Transaction
Metamask will ask you to confirm your transaction. Click “Confirm” on the screens below.
Confirm on the screen below as well:
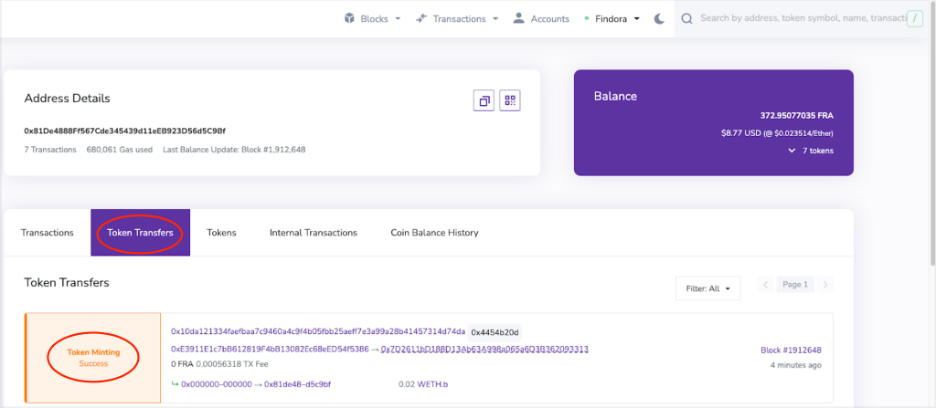
Step 5: View Transaction Details on EVM Block Explorer
To view the completed bridge transaction log, goto evm.findorascan.io. Enter your wallet address into the search bar at upper right of the block explorer and hit enter. Next, click on the “Token Transfers” tab and look for the “Token Minting” success message. A successful bridge transaction will lock your token on the BSC side of the bridge and mint a new, corresponding token on the Findora side of the bridge.