Using Truffle
Overview
To help more developers deploy on Findora, this tutorial will guide you through the truffle box setting, and use Truffle to deploy contracts on independent Findora nodes.
Prerequisites
This tutorial requires Node.js to be installed. You can download it through Node.js or run the following code to complete the installation. You can verify the correct installation by requesting the version of each installation package:
node -v
npm -v
Use Truffle to create a project
After you have fully installed Truffle, perform the following steps to create and run the Truffle project:
Create a new project folder and enter the project directory
mkdir findora-truffle && cd findora-truffleInstall
truffleand@truffle/hdwallet-providernpm install truffle @truffle/hdwallet-providerCreate a new truffle project (to prevent the project from overwriting truffle, it is mandatory to use an empty folder)
truffle initIt should generate the following directories and files:

Prepare
.secretwith yourmnemonicor yourprivate keyUncomment those following line in the begining of
truffle-config.jsto enable the key// const HDWalletProvider = require('@truffle/hdwallet-provider');
// const fs = require('fs');
// const mnemonic = fs.readFileSync(".secret").toString().trim();Configure Findora Anvil testnet under networks in
truffle-config.js:findora_anvil: {
provider:()=> new HDWalletProvider(mnemonic, `https://prod-testnet.prod.findora.org:8545`),
network_id: 2153, // findorad devnet's id
skipDryRun: true // Skip dry run before migrations? (default: false for public nets )
}Set solidity compilation version, optimization, plug-in and other information
compilers: {
    solc: {
      version: '0.6.12+commit.27d51765', // Fetch exact version from solc-bin (default: truffle's version)
      // docker: true,        // Use "0.5.1" you've installed locally with docker (default: false)
      settings: {          // See the solidity docs for advice about optimization and evmVersion
        optimizer: {
          enabled: true,
          runs: 200
        },
        // evmVersion: "byzantium"
      }
    },
  }
Create contract
All your contracts should be located in the
./contractsdirectory. By default, we provide a contract file and a library file, both ending with.sol.pragma solidity ^0.6.12;
import '@openzeppelin/contracts/token/ERC20/ERC20.sol';
contract MyContract {
//Construction method
constructor() public {}
//Your logic code
}You can declare dependencies by using import. Truffle will compile contracts in the correct order and automatically associate libraries when needed.
Compile the contract
To compile your contract, use:
truffle compileTruffle only compiles files that have been modified since the last compilation by default to reduce unnecessary compilation. If you want to compile all files, you can use the
--compile-alloption.truffle compile --compile-allThe output of the compilation is located in the
./build/contractsdirectory. If the directory does not exist, it will be created automatically. These compiled files are essential for the proper functioning of the Truffle framework. You should not manually modify these files outside of normal compilation or distribution. The file has the contract abi information you need. as the picture shows: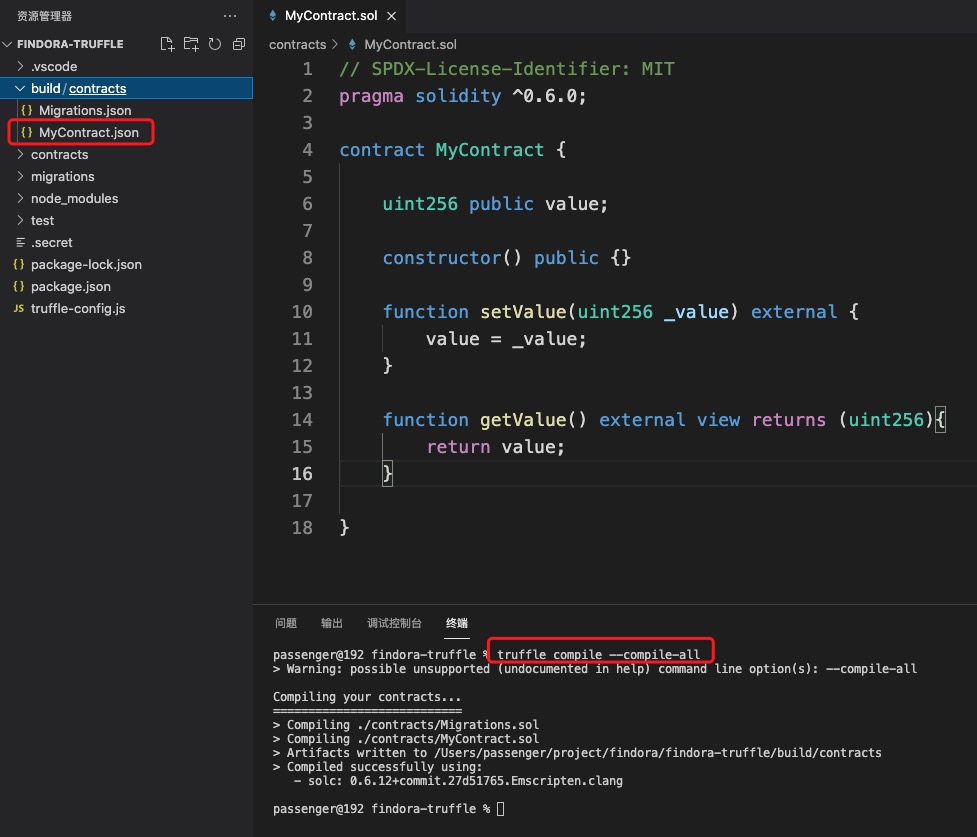
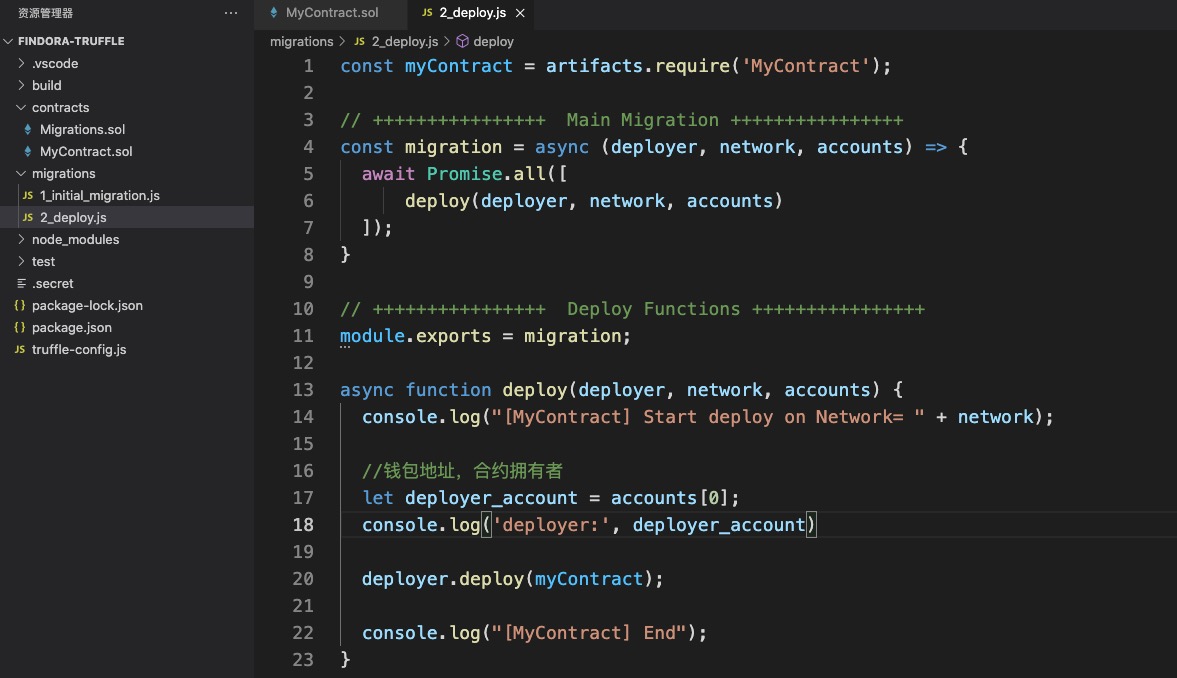
Create a deployment script file
const myContract = artifacts.require('MyContract');

// ++++++++++++++++  Main Migration ++++++++++++++++
const migration = async (deployer, network, accounts) => {
  await Promise.all([
      deploy(deployer, network, accounts)
  ]);
}

// ++++++++++++++++  Deploy Functions ++++++++++++++++
module.exports = migration;

async function deploy(deployer, network, accounts) {
  console.log("[MyContract] Start deploy on Network= " + network);

  //Wallet address, contract owner
  let deployer_account = accounts[0];

  console.log('deployer:', deployer_account)

  deployer.deploy(myContract);

  console.log("[MyContract] End");
}
Note that the file name starts with a number and ends with a descriptive suffix. The number prefix is required. The migrate command will be executed in ascending order according to the files beginning with the number in the migrate directory. The suffix is only to improve readability and facilitate understanding. as the picture shows:
Deploy the Contract
To perform deployment, use the following command:
truffle migrate --network findora_anvilThis command will execute all migration scripts located in the migrations directory. If your previous migration was performed successfully, truffle migrate will only perform newly created migrations. If there is no new migration script, this command does not perform any operation. You can use the option
--resetto execute the migration script from the beginning.You can also use the following command to start execution from the file with the number prefix 2.
truffle migrate -f 2 --network findora_anvil
Congratulations, you have completed the basic truffle operation guide!
Here is an example: https://github.com/FindoraNetwork/frc20-demo